At OneIPM, we recognize the challenges you face when managing large and intricate projects. To assist in simplifying your workflow and boosting productivity, we’re excited to introduce a key new feature in our latest update: Subtasks. This feature is specifically designed to break down larger tasks into smaller, more manageable units, transforming your project management approach.
Creating New Subtasks
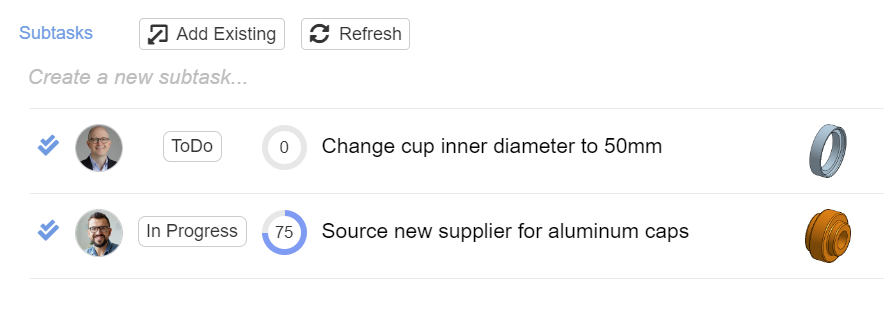
Creating new subtasks is easy. On the Task Edit dialog you will see a new section under Task Details labeled Subtasks. Simply type a description for your new subtask in the box that reads “Create a new subtask…” and press the Enter key on your keyboard. The new subtask will now appear in the list. You can create additional subtasks the same way.
Add Existing Tasks as Subtasks
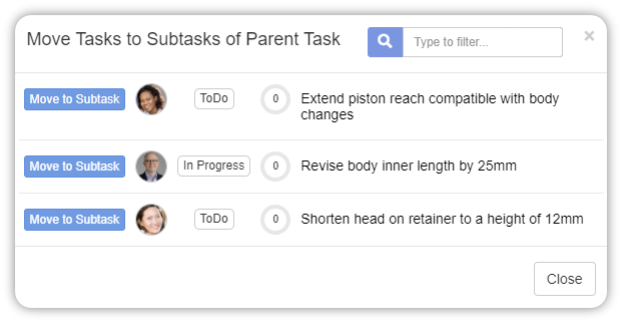
You can add existing tasks as subtasks just as easily. Note the button next to the Subtasks label that reads Add Existing. Pressing this button will launch a dialog where you can select from existing tasks to become subtasks of this parent task. Note: only tasks that become subtasks are listed here. For example, tasks that are already parent tasks or tasks that are currently subtasks of another task are not eligible to be added as a subtask to another task.
Quick Browse & Edit Subtasks
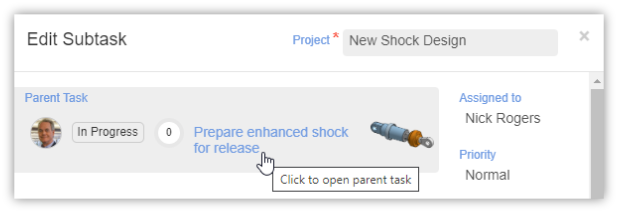
Another convenient feature is the ability to browse to and edit a subtask right from within the parent task edit dialog. You can click on the subtask name to edit that subtask. Once done, select the Save button, then at the top of the dialog select the Parent task to return to that task where you can then choose other subtasks to edit if so desired.
Unlink Subtasks
Unlinking a subtask from its parent can also be done right in the task edit dialog. While editing the parent, see the list of subtasks. The left button next to each subtask can be used to unlink this subtask from its parent. Unlinking will return this subtask to a normal task (this does NOT delete the task).

Highlighting Subtasks on the Project Board
On the project board, tasks and subtask look mostly the same. You will notice one difference. Any parent task (a task that contains subtasks) will have a bubble on the top-right of its task card indicating the number of subtasks it has. If you press and hold the left mouse button on this bubble you will see its child subtasks get highlighted on the project board. Additionally, you can press the left mouse button while holding down the SHIFT key on the keyboard on any task. If that task is either a child (subtask) or a parent task, the parent and children will all be highlighted.
Subtasks and Projects Important Notes
Note, subtasks have a restriction in that they must belong to the same project as their parent. Therefore, when editing a subtask, the top-right control to change project is disabled. Likewise, if you edit the parent task and change its project, you will get a prompt asking if it is ok to move all subtasks to the new project as well. The same goes for the project board. If using linked projects, you will not be allowed to drag and drop a subtask between the project board and the linked project. And if you do the same with the parent task, you will be prompted to move the subtasks as well. When subtasks are moved to a new project due to their parent moving, the subtasks will attempt to go to the same workflow state that they were previously in in the last project. For example, if a subtask is in the workflow state “ToDo”, and a state by the same name “ToDo” is in the new project, the subtask is put in that same state. If that state does not exist, then the subtasks will be placed into the same state and the parent task was placed in.
New Task Create/Edit Dialog Buttons
Additionally, we have replaced the Save button on the Task Create/Edit dialog with 2 buttons: Save and Save & Close. This provides a more efficient experiencing when creating or editing tasks.
When creating a new task, selecting Create will create the new task, clear the contents of the dialog, and allow you to create your next task. When you are creating your last task, simply select Create & Close to create the new task and close the dialog all with one click.
Similarly, when editing a task, at any point you can select Save to save your work and keep the dialog open. This is very handy for example when you wish to edit many subtasks of a parent task. Just open the parent task, in the subtasks area click any subtask to browse to it, make changes to that subtask, select Save, and then at the top of the dialog select the parent to browse back to the parent and edit the next subtask.
At OneIPM, we’re committed to ongoing improvement to better meet your project management needs. We’re confident that the addition of subtasks, along with our other enhancements, will provide you with a more powerful toolkit for managing your projects. Stay tuned for more updates, and as always, make sure to watch the brief video below demonstrating some of the highlights from this latest release of OneIPM.