We are excited to announce our latest release that delivers an all-new Resource Planner! Adopting the Agile process can be overwhelming. Our goal has always been to provide you with the tools to adopt as much or as little of Agile as your team sees fit. Some of the highlights of the Resource Planner are:
Multiple Views with Drag & Drop
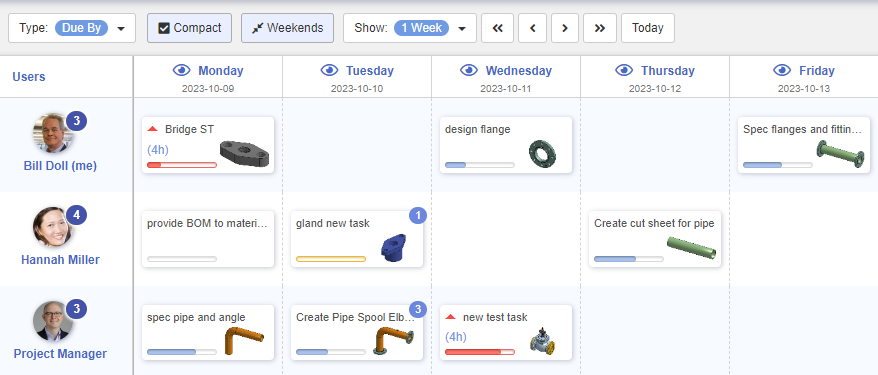
Each view in Resource Planner is comprised of rows and columns. The rows will always be a list of the project’s team members. The columns will vary depending on the Type of view you have selected. For example, the in Due By view, rows will contain calendar days, and in Risk view rows will represent the different Risk levels.
Balancing the project’s workload is easy. On any view, simply drag & drop tasks from one block to another. For example, if you determine Mary has too many high Priority tasks and Seth has only one, drag some tasks from Mary’s row onto Seth’s row. It is that easy! It you see Michael has several tasks Due By the end of the week, spread some out by dragging and dropping a few to Olivia, Emily and David.
Expand/Collapse Task Groups
Notice in the header row that there is an eye icon to the left of each label. Clicking on this icon will collapse all the tasks in that column into groups within each team member’s row. This is a great way to hide some tasks and enable you to focus on others. While in this collapsed mode, you will notice another eye icon next to each group of collapsed tasks. Clicking on that icon will allow you to expand/collapse just that group of tasks.
Compact View
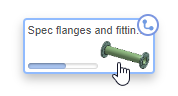
If you have many team members and lots of tasks, these views could get tall and wide resulting in a lot of scrolling. Selecting the Compact view button turns the tasks into smaller cards resulting in more task cards on the screen at one time. And even though some of the information is now hidden, a simple mouse hover over any task brings up a tooltip with all the relevant information about that task. TIP: in the Settings dialog (accessed from the top-right drop-down menu in OneIPM) you will see an option labeled “Single line task description (smaller task cards)“. Checking this box will reduce the size of the task cards even further.
Rich Calendar Controls
Calendar views will contain mostly calendar days. The exception is the first 2 columns, which are labeled No Date and Older, and the last column, which is labeled Newer. No Date column will contain all tasks that do not yet have a date assigned to them (Star Date or Due By, depending on the view you are in). The Older column contains tasks that are older than what can be displayed in the current calendar view. Likewise, Newer contains tasks that are newer than what can be displayed in the current calendar view.
The calendar view can easily be expanded beyond the default 1 week view using the toolbar at the top. You can also pan left and right in the calendar using the toolbar buttons. ‘<‘ moves backwards a day, ‘<<‘ moves backwards a week, and so on. You will notice that as you move forward/backward in the calendar view, the tasks currently in the Older and Newer columns may change. This is because as the visible dates change, a task may move from Older/Newer onto the board, or from the board into the Older/Newer buckets. For example, if the oldest date visible on the board is 2023-10-05 and a task is Due By 2023-10-01, the task will be in the Older column. However, if you click ‘<‘ a few times until 2023-10-01 is now a visible column on the board, that task will move out of the Older column and now be in the visible 2023-10-01 column.
The calendar views are a great way to take a bunch of tasks that have no date assigned yet and quickly drag and drop them on desired dates and, if required, onto the desired team member’s row.
NOTE: If you drag a task onto the Older or Newer columns, that task will be assigned the date that is currently displayed under the label of the column you dropped it on.
Additionally, you will notice another button in the toolbar for hiding/showing weekends on the calendar view.
Main Toolbar Controls Work Also!
By now you have noticed that the Resource Planner exposes a new toolbar directly under OneIPM’s main toolbar. Note: this toolbar can be hidden at anytime using the button with three dots in it located on the main toolbar.
But, rest assured, the main toolbar buttons also work for the new Resource Planner views. For example, toggling the Backlog button will show/hide tasks in the Resource Planner that are in the Backlog state. In the Type to filter box, enter some text found in a task description you are looking for and watch the tasks displayed in the view narrow down as they match the text you are typing. These are just two examples…
Subtask Enhancements
This first enhancement is minor, but is in preparation for new features coming soon. The subtask icon has changed from a double checkmark to a new parent/child type node as seen in the screenshot below.
Additionally, it is much easier to spot subtasks on a project board. When you move the mouse over a subtask, a subtask icon appears in the upper-right of the task card. Clicking and holding on this icon highlights all the subtask’s siblings and its parent.
Stay tuned for more updates, and as always, make sure to watch the brief video below demonstrating some of the highlights from this latest release of OneIPM.