Welcome to OneIPM
Thank you for choosing OneIPM!
We would love to hear your
feedback as you start using the product.
Some notes:
- If you have not done so already, please visit Getting Started for information on subscribing to and launching OneIPM.
- For more information regarding OneIPM (FAQ, Blog, YouTube, etc), please see the last topic in this How To "Where Can I Find More Information?"
Accessing OneIPM within Onshape
Note: Video available
Getting Started
OneIPM is integrated within Onshape in three (3) primary areas:
- Right-hand panel in the Onshape document listing area
- Right-hand panel once inside an opened Onshape document
- As a tab along the bottom of the window and an opened Onshape document
More information on these user interfaces can be found in the following two (2) sub-topics.
Onshape Document List Area
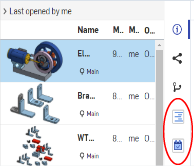
When you are viewing a list of documents in Onshape, select a document and then on the right panel (where you usually see the document info) you should see the OneIPM icon (logo).
Note: you must select a document before OneIPM options become available.
Selecting the OneIPM icon will display the OneIPM app in the right panel showing you the breakdown for that document (assemblies, parts, drawings, part studios, and tasks).
TIP: The information initially displayed in the OneIPM area is context sensitive.
Try doing a search in Onshape that will result in a part for example.
Select that part and then in the OneIPM area you will see all the versions of that part.
Also note, there is another OneIPM icon (looks like a calendar with a checkmark in it) right beneath the original icon you selected.
Selecting that icon will present you with all your currently open tasks in OneIPM.
For more information about navigating within the OneIPM app, please see the section "Getting Around in OneIPM" below.
Currently Open Onshape Document
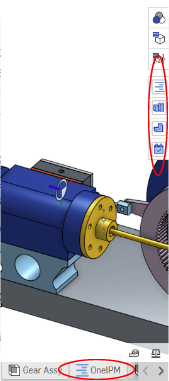
Once inside an open Onshape document, you will see OneIPM integrated in 2 places.
The first, take a look at the
right-hand panel (same location as the Onshape BOM for example).
You should see a tab with the OneIPM logo.
Selecting that tab will display a breakdown for the current document as described above in the Onshape Document List Area section.
And as mentioned above, you should see a second "task" icon that will show you all you open tasks.
Note: for tasks only pertaining to the current document, scroll to the bottom of the previous window (the OneIPM icon tab).
There may be other OneIPM icons available depending on what is selected.
For example, when in a Part Studio you will see a Part Studio icon that when selected will show you all the parts in that Part Studio.
And if you select a "single" part in the left panel under the feature tree, you should see another OneIPM icon that when selected displays all the versions for that part.
Now would be a good point to add OneIPM to the open document if you have not done so already.
You do this like any other app.
Just select the plus (+) button in the lower left of the window and then select OneIPM under the popup menu labeled Add Application.
Now that you have made sure the OneIPM app has been added to this document, you should see a
tab along the bottom of the window (just like other tabs... e.g. Assemblies, Part Studios, etc.) that has the OneIPM logo.
Selecting that tab will bring you into the full OneIPM app.
Again, see the section "Getting Around in OneIPM" below for more information on using OneIPM.
Getting Around within OneIPM
There are three (3) main sections of the OneIPM user interface: the
Dashboard,
Task Manager, and
Document Explorer.
The default section is your Dashboard, as indicated in the top-left of the screen.
To switch between sections, select the current section name (top-left) which exposes a drop-down menu allowing you to switch between sections (and subsections, which will be explained later).
Note: The drop-down menu is also the start of the breadcrumb display.
This is an active breadcrumb that not only shows where in the app you are, but also allows selecting items in the breadcrumb to return to any point in the app.
Additionally, there is a drop-down menu in the upper-right of the screen.
This is where you will find the settings dialog and links to OneIPM topics (like this How To guide).
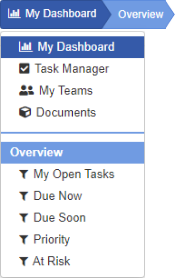
My Dashboard
Note: Video available
My Dashboard
Here you are presented with a high-level overview of your projects and tasks.
You can see things like "how many open tasks I have", "how many tasks are at risk", "how many are due now", etc.
To drill-down into more details, simply double-click on any of the boxes.
Alternatively, you can select on the main drop-down menu (top-left) and select from the subsection list (the lower half of the drop-down menu).
You can easily return back to the overview dashboard by selecting "Overview" in the breadcrumb area or "Overview" from the subsection of the main drop-down menu.
Task Manager
Note: Video available
Task Manager
The task manager can display project lists as well as a project board.
The initial view when navigating to the task manager is a list of projects.
There are 2 types of projects, private and shared.
Private projects could be things like your own ToDo list and are not visible to others in your company.
Shared projects are visible to everyone they are shared with.
For example, you can share a project with an Onshape Team, or an Onshape Company (if you belong to one).
Create a new project by pressing the New Project button.
In this dialog can can choose to share with a team or company (default is private).
Notice the project lists contain helpful information inline.
You will see an approximation of project completion.
This is based off of completed tasks divided by total tasks (excluding backlog).
Other helpful hints are how many open task and open tasks assigned to me (ones in a color bubble), how many due now, etc.
Selecting a project name will bring you to that project board.
By default, projects have four (4) states visible: Backlog, ToDo, In Progress, and Done but the backlog column(s) is hidden.
To display the backlog column(s), simply select checkbox button directly under the breadcrumb area.
This selection will be remembered.
Please see the section "Creating and Editing Projects" to learn more about the flexibility of projects.
My Teams
The My Teams section of OneIPM provides a better understanding of who has access to what.
Selecting My Teams from the main drop-down menu will present you with a view where all teams you belong to are listed as columns across the top.
If you are currently logged into a company, that company name will also appear as the last column.
The rows represent each user and their image will appear under each team (column) that they belong to.
There is a second section of rows at the bottom showing all shared projects and which teams (or company) they are shared with.
(Note: private projects are not listed here.)
Additionally, you can filter by a specific team using the Filter access drop-down menu.
The default view is a list, but you can choose to view the relationships as a node view.
There is a toolbar at the top which provides the ability to zoom fit the node view or collapse/expand nodes.
Double-clicking on a team node will also collapse or expand its children.
In the main drop-down menu (top-left) you will see a second viewing option for teams view, this is the Shared Projects View.
It’s very similar to the default Teams View except the columns represent your shared projects and the rows show which users have access to which projects.
Document Explorer
In this section of OneIPM you will be presented with a list of Onshape documents (most recently opened by default).
There are many things you can do in this list from changing the view type, adding a task to a document, opening the document in Onshape, etc.
We will cover the basics here and follow up with deeper dives on topics covered later in this document.
Bottom line, don't be afraid to try things here.
Right-click on a document to see what options there are for that document.
Double-click on a document to drill-down into that document (e.g. see an assembly's structure or a parts versions).
Clicking on the document name will open that document in Onshape.
Settings Dialog
The settings dialog is located in the upper-right drop-down menu.
One of the things you can do here is define default behaviors for drag and drop actions.
By default, when you drag and drop an unassigned task onto a working column (e.g., In Progress, Testing, etc.) you will be asked if you would like to take ownership of that task.
While for most people this saves them a step, for a manager who is rebalancing a workload this could be an annoyance.
So now in this case the manager could turn off the default behavior so the she/he is not contently asked to take ownership of a task that they do not intend to.
When dragging and dropping a task on to the done column, the default behavior is to ask if you would like to change the progress of the task to 100% complete (assuming it is not already marked as such).
Again, this behavior can be turned off in the settings dialog.
There is also a setting to enable saving column states.
Column states supported are visibility (hidden/visible) and column order.
Once you have you visible columns in the order you prefer, you can enable this setting to remember these preferences.
Next time you return to this view, your preferred setting will be restored.
Each view (document, assembly, BOM, part studio, etc.) will have its own settings saved, thus enabling you to have different preferred views for each list type.
Disabling this setting off will restore views back to their default states next time they are displayed.
OneIPM was designed with a fair amount of whitespace to keep it easy on the eyes.
If you find you have a large number of tasks, documents, etc., you can check the option to reduce whitespace resulting in viewing more information on the screen at once.
There is also the ability to reduce the size of tasks cards even further by checking the option to display only a single line description for tasks.
Document Explorer Views

There will be different viewing options within the Document Explorer section depending on where in the drill-down your are.
For example, when viewing a list of documents your options are to view by grid (default) or list.
If you are in an assembly, you will also have three (3) additional viewing options: BOM, Tree and Node.
To change view type, select from the buttons labeled as such directly under the breadcrumbs at the top of the interface.
Grid View
In the default grid view, there is a slide control in the upper-right corner of the interface.
Use this to change the size of your thumbnails to see more items on a page or larger images.
This setting will be remembered between sessions.
Double-clicking on an item will drill-down to the next level (where applicable).
Right-clicking an item will show you all available actions such as creating an associated task, opening in Onshape, etc.
When viewing a document listing, scroll to the bottom to see a list of tasks associated with that document.
The user profile image overlaid on each grid item is that of the person who created the document.
Hovering over the profile image will display their name.
You will also see at the bottom of most grid views is a list of associated tasks.
If you are on an assembly or part view, the list of tasks seen here are those associated directly with that assembly or part.
However, if you are on a document or part studio view, the list of tasks can be directly associated with that item (document or parts studio) and/or...
- If a part studio view, tasks in list could also be any associated with parts in this part studio.
- If a document view, tasks in list could also be any associated with parts, part studio, assemblies and drawings within this document.
List/BOM Views
List (and BOM) views are what you select when you want to see or edit metadata for the items in the list.
This is similar to Excel in that you can double-click on a cell and make changes.
If you are not allowed to make changes to a particular cell, it will be grayed out.
Some reasons for not being able to make changes could be now write permissions to that document, a field that is not modifiable, etc.
Viewing options for the list are also quite flexible.
You can drag a column by its header to a different location (reorder).
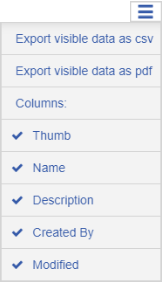
You can use the drop-down menu (top-right of grid header) to un/hide columns.
Also, in that drop down are options to output the list to a PDF or CSV file.
Company custom properties will be listed there as well.
Finding information in a list is easy.
You can click on any header to sort (ascending, descending, and back to original).
There is also a button at the top labeled "Filter".
Selecting that button will toggle the visibility of filter input boxes in the header.
Typing in any filter box will filter by that text withing that column.
The BOM view differs from the flat list in that the Name field is indented to show product structure and there as an additional column for Item No.
Another cool feature in the BOM view is auto-summing!
When editing values in a field that was defined as numeric (this definition is assigned at time of custom property creating within Onshape) OneIPM will sum the values up to each sub/assembly.
The values for that column will be green at each sub/assembly level to indicate they are calculated automatically.
Of course, you can edit those green values and override with whatever you choose.
If you choose to modify an auto-calculated field, OneIPM will change the text color to red indicating you have overridden a previously auto-calculated value.
To return to the auto-calculated value, simply clear the field.
Tree/Node Views
These are arguably the most exciting views!
The tree view will show your product structure as a horizontal tree layout.
Complete with thumbnail images.
This is a great way to get a better understanding of an assembly, seeing it all drawn out complete with relationships.
If any item has more a quantity of more than one (1), it will be indicated with the quantity shown in a red bubble on that thumbnail.
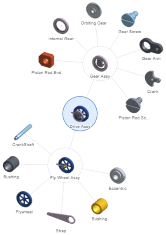
The node view is similar in that it is a great visual of product structure.
However, this view attempt to compensate where some assembly structure can get very "wide" in the tree view.
The node view organizes items in more of a circular pattern attempting to optimize the available screen space.
Another cool feature of the node view is you can drag items to move them around.
Try it!
Both views allow for collapsing/expanding subassemblies by clicking on them.
A collapsed assembly has a light-blue background so they can easily be spotted.
There are also expand/collapse all buttons at the top along with a zoom fit button.
The mouse middle button can be used to zoom in/out and you can pan around with a simple click drag on any white space.
Assembly Versions & Configurations
Assembly product structure will be displayed in an as-built state under certain circumstances.
This includes the specific revisions and configurations of child items in the assembly at any given revisions.
Versions
When viewing an assembly in OneIPM, if the assembly has revisions you will now see a Revisions drop-down menu in the top assembly window toolbar.
Selecting this menu will allow you to pick from one of the Revisions this assembly was released as.
Doing so will update the view to show the product structure for that assembly as existed for the selected revision.
Also note that items in the assembly that were inserted at a specific revision have that revision following the name (e.g., "My Sub-assy (B)" where "B" is the revision of that sub assembly).
If the name is too long to see the revision, mouse over the item to see the tooltip which will display the entire name and the revision.
If a subassembly was inserted at a specific revision, double-clicking on the subassembly will drill-down into that item and show its product structure as it was built for that revision.
You also have the revision drop-down menu in the top assembly window toolbar which allows you to view a different revision if you choose.
Configurations
Configurations are handled in a similar fashion to revisions.
When viewing an assembly, if two items are inserted as different configurations, each one will appear separately.
As a best practice it is recommended that named configurations be used to easily distinguish one configuration from another.
As with revisions, double-clicking on a subassembly of a specific configuration will drill-down and display that assembly at that configuration (and revision if it was released).
Please note, double-clicking a part will drill-down and show all versions/revisions of that part, but will not yet do so in a configuration specific way.
This functionality will be added in a later release of OneIPM.
Another handy feature is the auto updating of the assembly view when changing the configuration of that assembly in Onshape.
To see this in action:
- First open an assembly that has configurations in Onshape.
- Next select the OneIPM assembly icon in the right-hand panel.
- OneIPM will open displaying that assembly as it is currently configured.
- Select any view in OneIPM that you like (BOM, tree, etc.).
- Now back in Onshape make a change to the configuration.
Notice OneIPM automatically updates it's view accordingly.
Exploring Part Versions
As you drill-down in the document explorer, you will most likely run into parts.
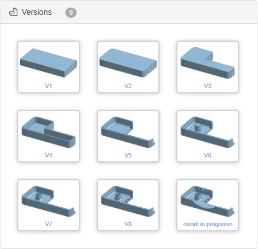
When you drill-down into a part you will be presented with a list of all version of that part.
This is a great view for someone who is not familiar with the part to get an idea of how it was created.
Looks great in the grid view, but there is also a button at the top labeled Show Versions you should try.
Selecting that button opens a window where you can drag a slider and what the part visually morph from one version to another!
When selecting a specific configuration of a part (drilling down in an assembly, or using the configuration manager in Onshape), the thumbnail images will be for that configuration at each version.
NOTE: Since some configurations may not yet have thumbnails generated, these may show up as missing.
This is a limitation in Onshape as the service does not generate images for every possible configuration combination.
They do usually get generated when a specific version of configuration is used in an assembly.
Creating and Editing Projects
Note: Videos available
Creating Projects in OneIPM and
Managing Projects in OneIPM
When in the task manager you should see a list of projects and a "New Project" button at the top.
Selecting this button will open a dialog enabling you to create a new project.
To edit an existing project, either right-click on the project and choose Edit Project, or select the icon on the left that looks like a pencil and paper.
Note: When you are on a project board, if you own the project, you will see an edit icon next to the project name in the breadcrumb are at the top of the screen.
Clicking this will allow you to edit the project right from the project board without having to return to the projects list page.
On the Create/Edit Project dialog you can change the project's properties, define the workflow states, share the project and create links to other projects.
You can choose which workflow states are visible and change their descriptions if you choose on the Workflow tab.
There must be at least one (1) state visible and state descriptions cannot be blank.
By default, a new project has four (4) states visible and they are named: Backlog, ToDo, In Progress, and Done.
You will notice a blue background around the middle five (5) states.
These are considered the "in progress" states.
In other words, the team has committed to doing these tasks but they are not yet complete.
The first two (2) states are backlog states.
This is because some people like to have a traditional backlog (if we get time, we will do these) and a freezer (we will NOT do these, they will get done in another sprint).
And the final state is the done/completed state.
Also note, you can reorder the middle five (5) states (the "in progress" states) by using the up/down arrow buttons located to the right of the state description.
Project Templates
Creating a new project can be quick if you already have an existing project you woud like to use as a template.
Once you have created a project with your desired workflow state names, visibility, etc, then next time you create a new project you can now select that existing project to use as a template.
This will copy all the settings from the existing project to this new project, eliminating the need to redo all those settings for each new project.
Likewise, you can also edit an existing project and update its settings to match another existing project with a single click.
Other project settings like Shared With and Linked Project will also be copied over from the template project.
Additionally, there is a Default Template option at the top that will reset all settings back to the OneIPM defaults.
Under the project name you selected to use as your template, you will see an option to copy over the tasks from that template project to this project.
If you happen to start off every project with a few common tasks, this enables you to create those tasks just once in a template project and then copy them to your new project.
Caution: This option is also available when editing a project.
If you create a project from a templet and forget to copy the tasks, you can always just edit that project, select the template project again and then select to copy the tasks.
While this is a great convenience, if you were to copy that tasks twice, you will end up with duplicate tasks (which of course you can easily delete).
Share Project
On the Sharing tab you may see a list of options for sharing this project.
By default, "No one" is selected (private, only you have access to this project and its tasks).
If you belong to an Onshape Company, the company name will be listed under the "Company-wide" section.
If selected, this project and its tasks will be shared with everyone in your Onshape Company scope.
If you have any Onshape Teams created within Onshape, those teams will be listed under the "Onshape Teams" section.
Likewise, selecting any team name will share the project and its tasks with everyone who belongs to that Onshape Team.
You can select multiple teams to share the project with if you choose.
Note: you can always change the project's sharing status later on.
Just be careful and understand that if you do change sharing from a team share to private, people who used to have access to those tasks may no longer be able to see them.
Link Project/State
Note: Video available
OneIPM Linked Projects
On the Sharing tab at the bottom you will notice two (2) drop-down controls.
In the first you select the project to link to and the second is the workflow state within that project.
This instructs OneIPM to create a link from this project to the workflow state of another project.
After creating the link, you will notice on the project board there is an additional workflow shown.
This is the workflow state you just linked to and it is displayed in the backlog area right before all other backlog states of this project (if any).
The left-most workflow state. It is clearly marked as such and is visually different from normal workflow states.
(Note: To view you may need to select the Backlog checkbox button at the top.)
This is very handy for many projects in which you may want to maintain a master list to pull from.
One example could be a project which will run over the course of several independent iterations (sprints).
You could have a project called "Main" that contains the complete backlog of everything you want to complete, start to finish.
Next you can create a project called "Sprint 1" and link to Main's Backlog workflow state.
Now on the Sprint 1 project board you can pull tasks directly from the Main Backlog to your Sprint 1's ToDo workflow state.
When Sprint 1 is complete and you start Sprint 2, you would also link that to Main's Backlog workflow state from that project.
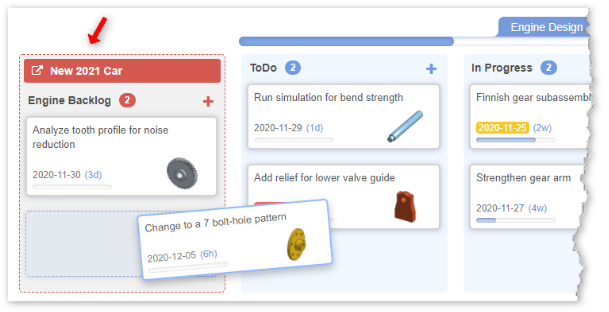
You can imagine other uses like having a Car project that contains all tasks for the car in one place.
And perhaps in the Car project you have workflow states named "Engine", "Drivetrain", etc.
In each you could store the backlog of tasks for that subsystem.
This way at a glance you can see all remaining tasks for the entire Car project all on a single board.
Then in the subsystem projects like Engine, you could link to the Car project's Engine workflow state enabling you to pull tasks directly from that state into the working board for the engine where they can then be processed through that workflow.
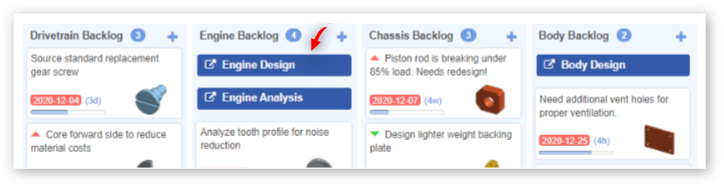
Notice the image above.
This is an example of the Car project mentioned which the Engine project links "to".
You can see how there is an indicator on any workflow state that shows the project(s) linked to that state.
Clicking on the indicators will browser to that project.
Archive/Delete Project
There is also an option at the bottom of the edit project dialog to archive the project.
Doing so will remove the project from the normal list of projects.
To see projects that have been archived, just select the Archived Projects checkbox button at the top.
When editing an archived project, you have two (2) additional options (bottom-left).
One option is to un-archive the project.
The other option is to delete the project.
NOTE: Please be advised, that deleting a project will also delete all tasks associated with that project.
This action cannot be undone.
The Project Board
The project board is where you manage all your tasks for the selected project.
At the top you will notice a progress bar.
(Note: the progress bar is only visible if you have the Done column and at least one other non backlog column visible.)
This is an approximation of how complete the project is.
This is based off of completed tasks divided by total tasks (excluding backlog and hidden columns).
You will see a column for each state defined when you created the project (defaults would be: Backlog, ToDo, In Progress, and Done).
By default, the backlog column(s) are hidden.
To display the backlog column, simply select checkbox button directly under the breadcrumb area.
This selection will be remembered.
The Done column's tasks are dimmed to help keep focus on the "doing" columns.
Each state (column) name has a number in a bubble next to it.
This is the number of tasks in that state.
If you own the project, you will see an edit icon next to the project name in the breadcrumb are at the top of the screen.
Clicking this will allow you to edit the project right from the project board without having to return to the projects list page.
If this is a shared project, there will be an addirional button labeled "Shared with...".
Selecting this button will launch a new dialog window.
If the project is shared with a company, it will simply state the company name and that the project is shared with everyone in that company.
If the project is shared with a specific team, the dialog will show the team name and a full list of everyone belonging to that team.
Note: The Refresh button at the top.
This will turn red either after a few minutes of inactivity, or if another user makes a change to the same board.
It is good practice to do a refresh prior to making any changes on the board (reordering, editing, etc.).
Filtering Tasks
At the top of the project board is a button labeled "Show..." (this button is only visible on "shared" boards, not "private" boards).
This is a drop-down menu that enables you to just show tasks that are assigned to you, someone else, or unassigned.
This is great for times when you are looking for something to do and you can quickly filter for unassigned to see what tasks are available for the taking.
You will also find a text box at the top with the label "Type to filter...".
Typing in this box will filter the display to only show tasks with a description that contains the text you entered.
You can also use Type to filter in combination with the user filter mentioned above.
Both filters highlight with a yellow background as an indicator the view is currently being filtered and may not be showing all tasks.
Creating and Editing Tasks
Note: Videos available
Creating Tasks in OneIPM and
Managing Tasks in OneIPM
There are a few ways in which you can create a task.
When on the Project Board, you can select the "+ New Task" button at the top (default will be the first active state in the project’s workflow).
Or you can select one of the plus (+) buttons at the top of each state column.
This will open the Create Task dialog defaulting to the state of the column which the selected + button appeared.
Additionally, anytime you are in the Document Explorer you can right-click on a document, part, assembly and select Create New Task from the drop-down menu.
This will automatically create a task with an association to that item (document, assembly, part...).
To edit a task, simply double-click on it or right-click an select Edit Task from the drop-down menu.
NOTE you can also select Delete Task from that drop-down menu.
This will delete the task and this action
cannot be undone.
The Task Edit dialog has many "options".
You can assign the task to someone.
Set its priority, risk level, add a description, comments, and much more.
But the only two (2) that are required are the Name and Project.
All others are completely optional, so use them as you and your team see fit.
You will also notice that the details area of the Edit Task dialog has a toolbar.
The buttons and dropdown menus on this toolbar allow you to apply rich text formatting to the details section of the task.
You also have the ability to add links, links to an external image to display in that area, as well as embedding an external media object (video).

A few notes about
visual indicators you may notice.
-
If a Due By date was selected, and that date is within 7 days of today, it will be highlighted with yellow.
If it is overdue, it is highlighted in red.
-
When a Risk level is set the progress bar will highlight (red if high; yellow if medium).
-
When a task is marked as high priority, a red up triangle is displayed on the task, and if low priority, a down green arrow.
Drag and Drop (Reorder/State Change)
If you would like a task in a different spot within its column, simply drag and drop it to the desired position.
At any point during the drag, press the escape key on the keyboard to cancel the operation.
Likewise, if you want to change the state of the task, you don't have to edit the task and change it there.
Just drag and drop it to a different column.
When changing states OneIPM will try to save you time by making intelligent assumptions.
For example, if the task is unassigned and you drag it from ToDo to In Process, it will ask you if you would like to have the task assigned to you.
Or if you drag a task from In Process and drop it on Done but the progress indicator is less than 100%, it will ask you if you would also like to have its progress updated to 100%.
Moving a Task to a Another Project
If you would like to move a task to a different project, first open the task edit dialog.
Then select a different project from the project drop-down menu located in the top-right of the dialog.
Currently there is not a way to move multiple tasks at one time. (Coming soon...)
Where Can I Find More Information?
Please check out the following resources:
- Getting Started - Learn how to subscribe and launch OneIPM for the first time.
- FAQ - A list of frequently asked questions.
- YouTube - This is where you can find training videos for OneIPM.
- Blog - Great place to watch for the latest information and release history for OneIPM.